The Basics of Git Branching
Using a branching workflow in your coding projects is essential for organizing, tracking, and safely merging your code in any collaborative project setting. This method of project development is used constantly in any real-world development career in the coding, so making git branching and merging second-nature to you is a highly valuable skill. And it's very simple once you get used to it!
Here, we will walk you through the philosophy of git branching and how to incorporate this essential workflow into your GitHub projects.
Table of Contents
Links to other helpful Git Branching resources
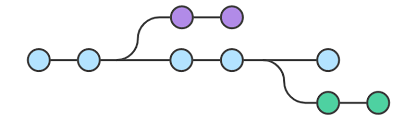
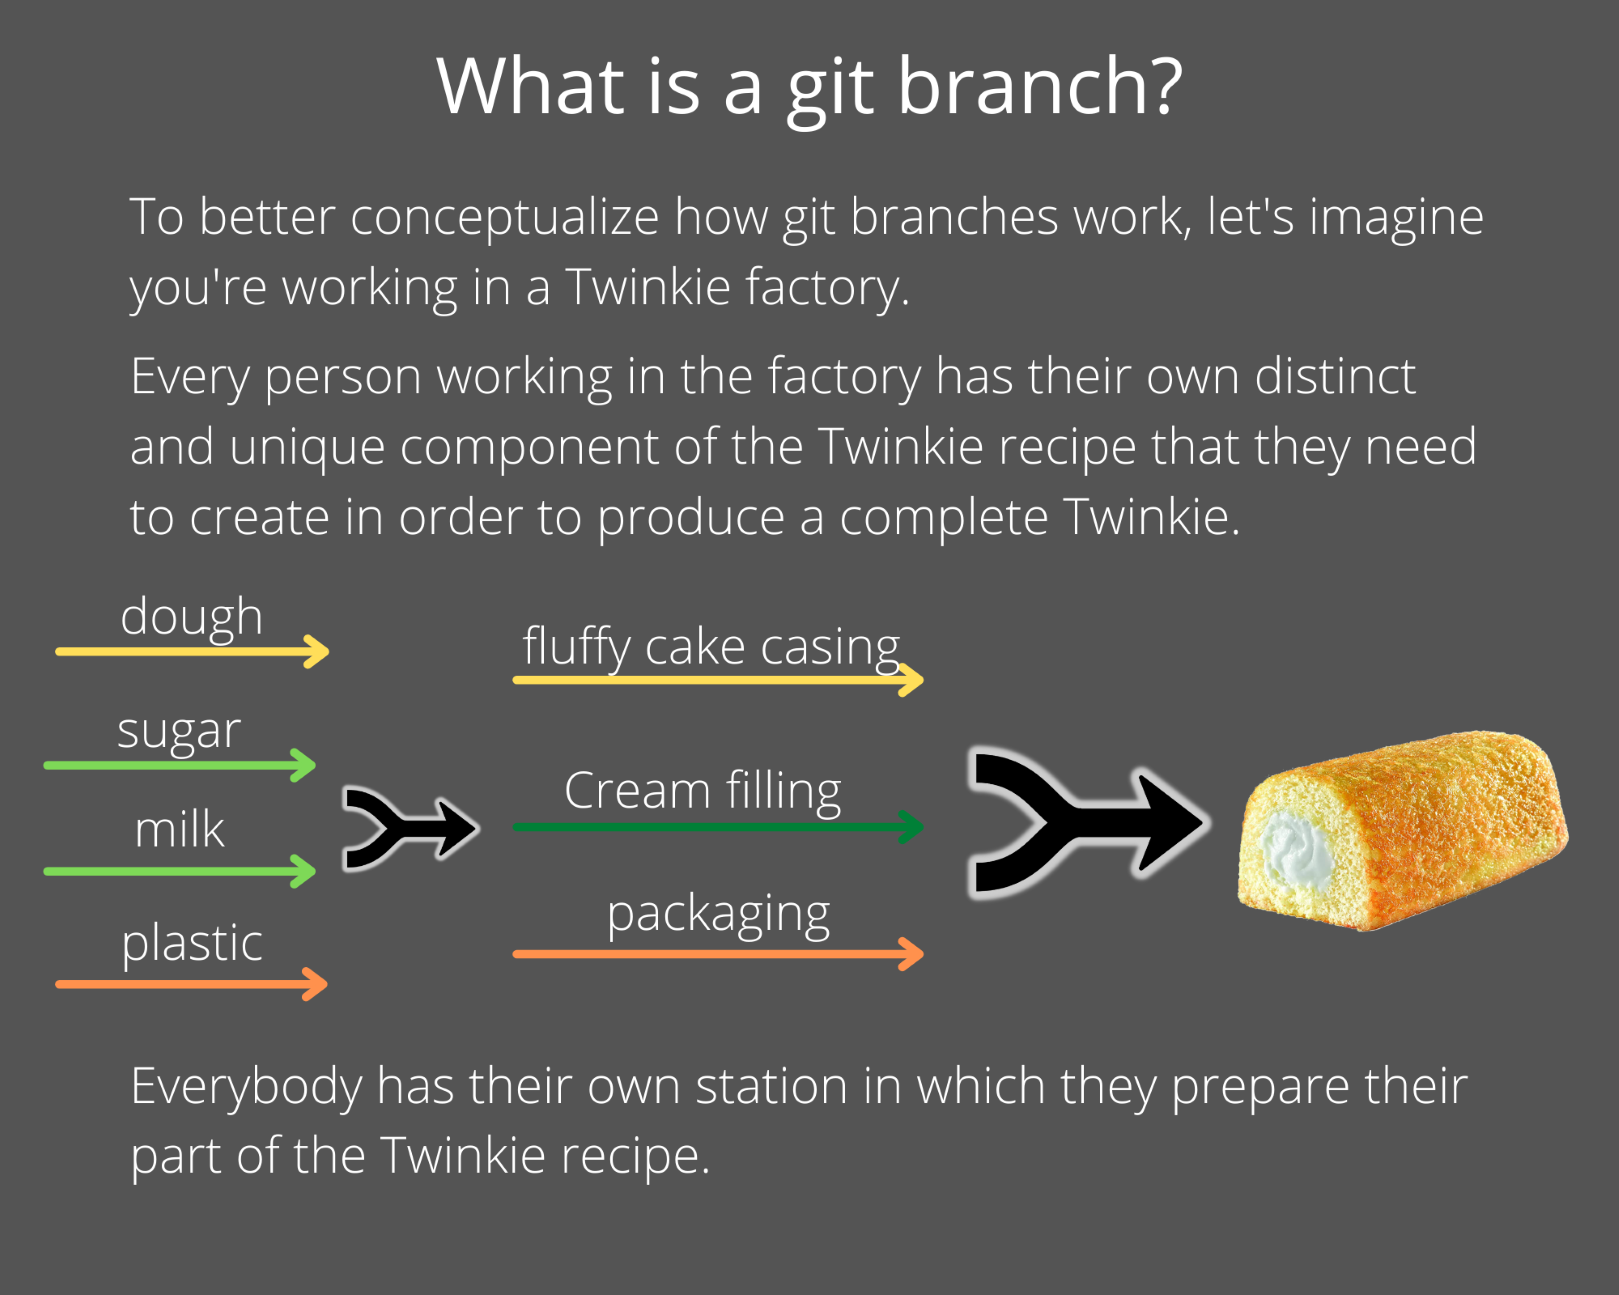
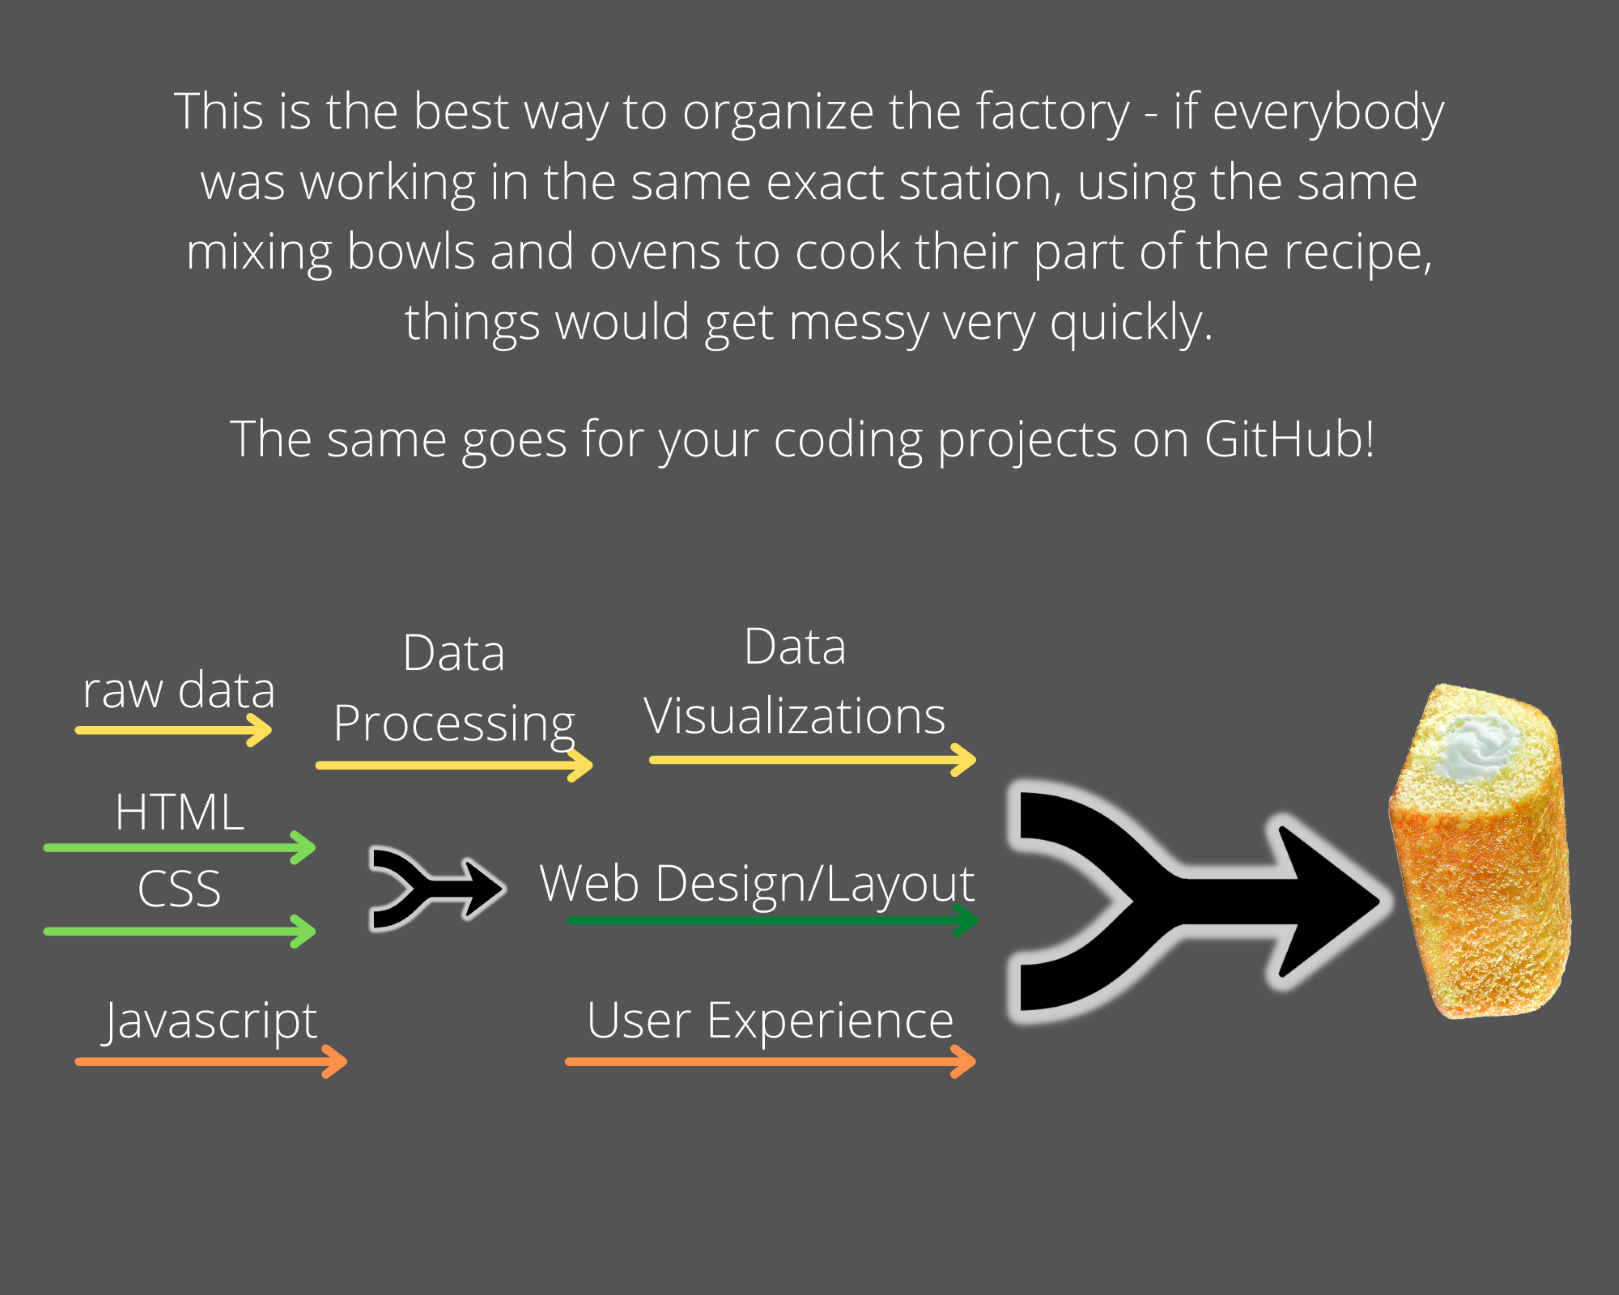
Why We Use Git Branches, Explained with Twinkies
The Terminal/Bash Shell Commands & What They Do
| Command | Description |
|---|---|
git branch |
Show all of the branches on your repo, with the branch you're currently on highlighted with
an
asterisk. * THIS COMMAND IS YOUR BEST FRIEND. Always check
which
branch you are on BEFORE editing any files in the repo AND before
adding/committing/pushing your updates. |
git checkout -b newBranchName |
Create a new branch off of whichever branch in the repo you are currently on. In this
example,
replace newBranchName with a name that includes your NAME, and
a
BRIEF DESCRIPTION of what kind of development work you will be doing in
this
branch.
|
git push --set-upstream origin branchName |
Your git bash/terminal will ask you to enter this command the first time you try pushing to
a new
branch. See a full explanation of an upstream in the section below. |
git checkout existingBranchName |
Use this command to SWITCH to a different existing branch in the repo. ALWAYS BE WARY of what branch you are currently on to ensure you do not commit and push file changes to the wrong branch!!! |
git merge main |
Use this command when you are currently on your own personal development
branch to
update your branch any new changes and commits made on the main branch. It's good practice
to do
this if you see that your branch is quite a few commits behind main. using
git pull to update your feature branch with new work in the main branch
will not
work. It will only pull in changes made on the remote version of your branch.
See the
diagram illustrating what this command does in the below section titled Keeping your
branch
Up-To-Date with main branch. |
git status |
List all new or modified files |
git diff |
Show file differences that haven't been staged |
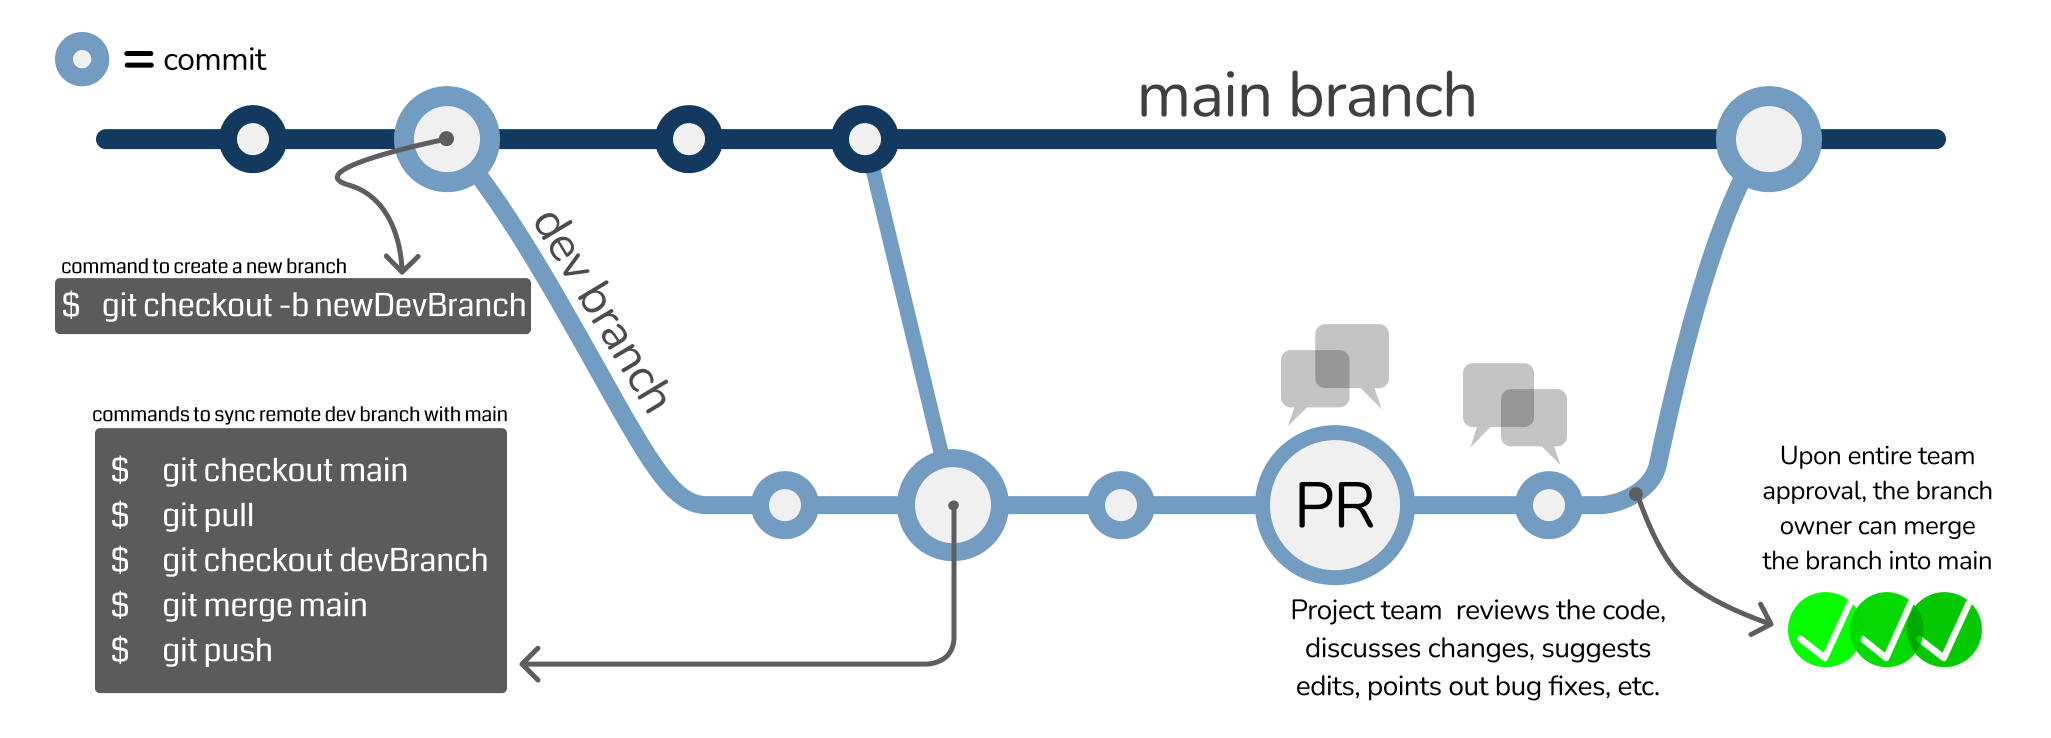
Git Branch Basic Workflow
The Ultimate Git Branch Daily Checklist
Follow these steps every time you start working on your project code, and you will be a Git Branching Ninja in no time.
-
Step 1:
CHECK your remote repo on Github.com for any new commits from your teammates onto main or the current branch you're working on. If you notice any new commits from your teammates on the MAIN branch, GitHub will notify you with a message: "This branch is n commits behind main." If your branch is a few commits behind main, proceed to the following sub-checkpoints to UPDATE your local main branch. If not, proceed to Step 2.- OPEN your git bash or command line terminal to your repo directory and enter
git branchto see which branch you are currently on. - If you're not on the main branch, use
git checkout mainto switch to it. - Enter
git status. This should confirm that your local main branch needs to be updated. It will even suggest that you do agit pull, which is the next step. - Enter
git pull. Watch in awe as Git does its magic and updates your local main branch. - IMPORTANT NEXT STEP: DO NOT STAY ON THE MAIN BRANCH. Enter
git checkout YourBranchNameto switch back to your own development branch.
- OPEN your git bash or command line terminal to your repo directory and enter
-
Step 2:
OPEN your git bash or command line terminal and usegit branchto see which branch you are currently on. If you're not on your own development branch, usegit checkout YourBranchNameto switch to your development branch. -
Step 3:
Use
git statusto see if you have any changes or updates you've made to your project code that has not been pushed to the remote repo before you begin working. It's always a good idea to keep your individual commits GRANULAR - in other words, every time you complete a small chunk/complete unit of development, you should push it to your remote repo as it's own commit.For example, if you've made changes to your HTML/CSS, COMMIT THOSE CHANGES to your branch BEFORE going and working on some other aspect of your code, like data processing or data visualization. DO NOT make huge changes to a whole bunch of your project files and push them up to the repo in one gigantic, messy commit. This method of working will ensure that your development work on the repo is trackable, and it makes it much easier for your teammates to see which commit needs to be fixed when you create a Pull Request later on.
-
Step 4 - When you're ready to commit your code updates to your branch:
When you've got a good bit of code complete, and you're ready to create a new commit to your development branch - follow the normal process of adding, commiting, and pushing.
WARNING: ALWAYS use
git branchto check and make sure you're on the correct branch BEFORE pushing a new commit!!Once you've ensured that you're on your correct development branch, enter these commands in your Git Bash (Windows) or your Terminal (Mac) in the following sequence:
git add .ORgit add -A- What is the difference between
git add .andgit add -A, you ask? -
-
git add -Astages all changes -
git add .stages new files and modifications, without deletions (on the current directory and its subdirectories). -
git add -ustages modifications and deletions, without new files
-
- What is the difference between
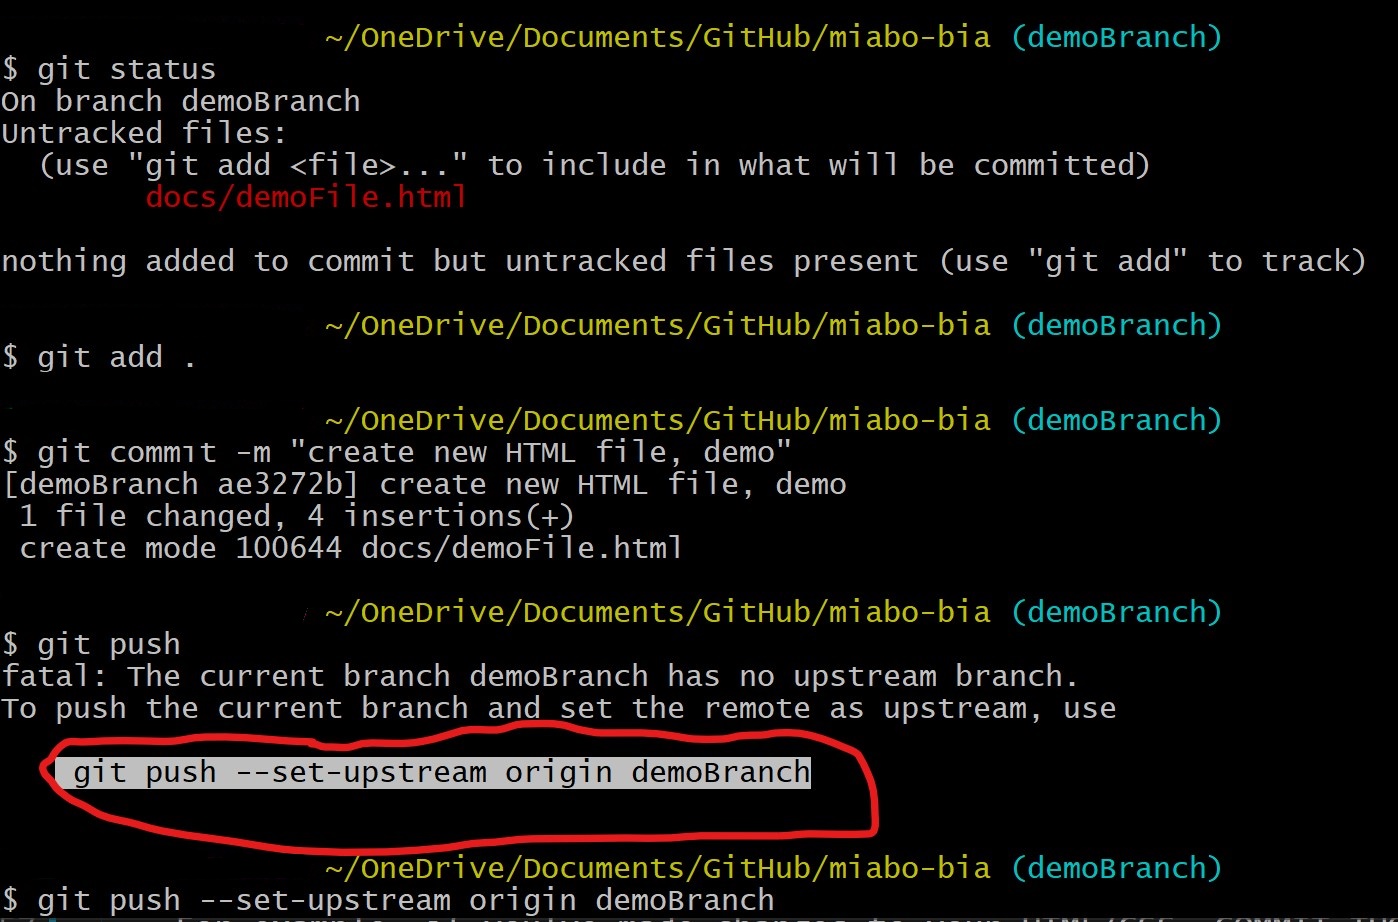
git commit -m "Your descriptive commit message here, briefly summarizing the changes you made in this commit."git push- NOTE: if this is the first commit you've made to your branch, git will give you a message that looks like this:
- Here, git is simply telling you that you must set the upstream origin for this branch. It gives you the exact command you must enter, which is highlighted in the demo screenshot. Use your cursor to highlight that message in your git terminal, Right-click it, and select Copy. (You cannot use hotkeys like Ctrl+C or Ctrl+P to copy and paste in the git terminal.)
- Paste the copied command by right-clicking and selecting "Paste." Be sure you copied the entire command exactly as it is displayed in the error message.
- That's it! Congrats on your branch commit!
Keeping your branch Up-To-Date with main branch
Your git terminal will tell you when your working branch is a couple commits behind main.
You should always keep your branch up to date with all of the development code committed to main so that you do not run into nasty merge conflicts and development lags/bugs when you eventually merge your branch into main later on.
To do this, you must complete the following sequence of Git Bash or Terminal commands:
- enter
git checkout mainto switch to the main branch. - Then enter
git pullto pull in any remote changes to main to your local main branch. - Use
git checkout myBranchNameto switch back to your development branch. - Now, enter
git merge mainto incorporate the new commits from the main branch into your branch's commit history. Note: this is not the same thing as merging your branch into the main branch. - NOTICE: you are now probably in the VIM editor. Don't panic. Follow the
following sequence to get out of the VIM editor and complete your merge:
- Enter
i(i for insert) - Write your merge message. (you could also write nothing - VIM sometimes writes your merge message for you. In that case, just hit Enter.)
- Press “esc” (escape)
- Write
:wq(write & quit) - Then press enter.
- Enter
- Now that you've synced your local dev branch with the new commits from main, you must now update
your remote branch. So, just do a simple
git push.
Following this exact sequence in your command line prompt should allow you to update your development branch with the up-to-date main branch commits. Check your repo on Github.com to see that your development branch no longer has the "[x] commits behind main" message.
Illustration from Atlassian

Pull Requests
When you've completed all of the development work for your branch with your last commit, and you're ready to pull the code from your branch into the main project production branch, you must create a Pull Request.
A Pull Request is exactly what it sounds like: a request to your team to check that you can pull your development branch into the main branch.
Here's what happens in a typical Pull Request:
- The developer creates a pull request via Github.
- The rest of the team reviews the code, discusses it, and alters it.
- Once the Pull Request is fully reviewed and approved by all team members, the developer merges their development branch into the main branch through GitHub. Be sure to check the option to "Delete branch upon merge" to destroy the development branch once it's merged.
Common Questions and Answers
What is an upstream?
(from Slack Overflow)
An upstream is simply another branch name, usually a remote-tracking branch, associated with a (regular, local) branch.
Every branch has the option of having one (1) upstream set. That is, every branch either has an upstream, or does not have an upstream. No branch can have more than one upstream.
The upstream should, but does not have to be, a valid branch (whether remote-tracking like
origin/B
or local like main). That is, if the current branch B has upstream U, git rev-parse
U should work.
If it does not work—if it complains that U does not exist—then most of Git acts as though the
upstream is not
set at all. A few commands, like git branch -vv, will show the upstream setting but mark it as
"gone".
What good is an upstream?
If your push.default is set to simple or upstream, the upstream setting will make git push, used with no additional arguments, just work.
That's it—that's all it does for git push. But that's fairly significant, since git push is one of the places where a simple typo causes major headaches.
If your push.default is set to nothing, matching, or current, setting an upstream does nothing at all for git push.
(All of this assumes your Git version is at least 2.0.) The upstream affects git fetch
If you run git fetch with no additional arguments, Git figures out which remote to fetch from by consulting the current branch's upstream. If the upstream is a remote-tracking branch, Git fetches from that remote. (If the upstream is not set or is a local branch, Git tries fetching origin.)
The upstream affects git merge and git rebase too
If you run git merge or git rebase with no additional arguments, Git uses the current branch's upstream. So it shortens the use of these two commands.
The upstream affects git pull
You should never use git pull anyway, but if you do, git pull uses the upstream setting to figure out which remote to fetch from, and then which branch to merge or rebase with. That is, git pull does the same thing as git fetch—because it actually runs git fetch—and then does the same thing as git merge or git rebase, because it actually runs git merge or git rebase.
(You should usually just do these two steps manually, at least until you know Git well enough that when either step fails, which they will eventually, you recognize what went wrong and know what to do about it.)
The upstream affects git status
This may actually be the most important. Once you have an upstream set, git status can report the difference between your current branch and its upstream, in terms of commits.
If, as is the normal case, you are on branch B with its upstream set to origin/B, and you run git status, you will immediately see whether you have commits you can push, and/or commits you can merge or rebase onto.
This is because git status runs:
git rev-list --count @{u}..HEAD: how many commits do you have on B that
are not on
origin/B?
git rev-list --count HEAD..@{u}: how many commits do you have on
origin/B that are not
on B?
Setting an upstream gives you all of these things.